|
Croft Press
/ David
/ Research
/ Management
Advancing Tasks Grid
David Wallace Croft
2017 Sep 29 Fri
If you have a list of recurring tasks, you might find that the easier tasks
are accomplished more frequently than the other tasks in the list and that
the hardest tasks are often neglected for extended periods. To balance the
work out, you could use a rotating tasks list in which all tasks must be completed within the cycle before a task can be repeated at the start of a
new cycle. This is often unrealistic, however, as it is often advantageous
to repeat an easy task before you take on a hard one.
A more realistic system is one that it simply tracks the number of days since each recurring task was last accomplished. Efforts can then be loosely prioritized on those tasks with the highest number. In effect, the number of days since a task was last done becomes a fuzzy quantification of the priority.
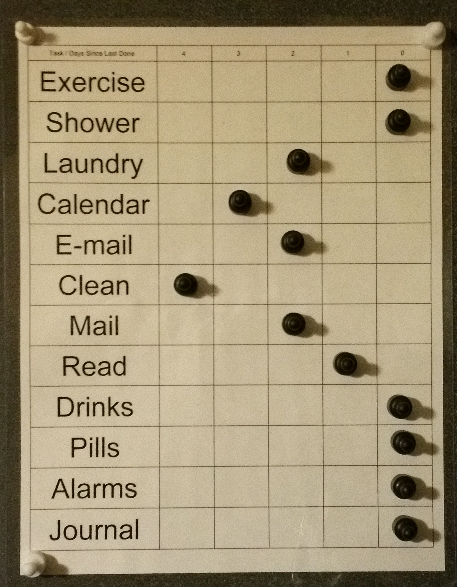
The templates provided here lay out a grid where each row represents a
recurring task and the position of a marker along the row represents how long it
has been since the task was last accomplished. Over time, the markers for neglected tasks appear to advance across the page whereas favored tasks are seen to be frequently pushed back. For reasons related to how we intuitively interpret progress depicted on a page, I put the column representing zero days on the far right.
-
Download
As the original author and copyright holder, I have dedicated the following two advancing tasks grid template files to the public domain. You may use them as you wish.
-
Print
One template is oriented for printing in portrait mode and the other for landscape. The portrait mode template has more rows but less columns than
the landscape mode template.
-
Label
Use the first column to label the recurring tasks. Each row will track an
individual task.
-
Laminate
Lamination makes the pushpin magnets easier to slide across the page.
Personal-use laminators are now inexpensive.
-
Mount
Mount on a steel surface such as the side of a refrigerator or a filing cabinet.
If you use magnets to mount the laminated page, use white pushpin magnets so they will not be confused with the black magnets used to track progress.
Place the white pushpin magnets at the top-left, top-right, and bottom-left
corners. Do not place a white pushpin magnet at the bottom-right corner as
it would be too close to a black magnet in the bottom-right cell.
-
Track
Place a black pushpin magnet on each row in the far right column marked "0" (zero). Pushpin magnets are preferred over button magnets as they are easier to move.
Every morning, advance each black pushpin magnet one column to the left.
When you complete a task, move the black pushpin magnet on its row
all the way to the right back to the zero column.
Prioritize your efforts on those tasks where the black pushpin magnets are in columns farthest to the left.
|
